

So you want to start learning Docker, Kubernetes, Helm, Terraform etc. but don't want spend dollars or risk running past "free trials" on cloud providers. The good news is you can get started at home on your own hardware.
Outcomes
The following outcomes should be achieved as part of this lab:
- A functional Kubernetes cluster
- Functioning persistent storage
- A deployment of Bitnami Kubeapps
- Deploying applications via
- Native Kuberentes (
kubectl apply) - Terraform
- Helm CLI
- Helm via Kubeapps
- Native Kuberentes (
Requirements
For this lab you're going to need 4 machines. These could be physical PCs, but VMs are much more practical. You can use any HyperVisor of your choice, VMware Player, Hyper-V, ESXi, VirtualBox, or another.
We will be creating the following machines with these minimum specs:
- NFS server
- 1 vCPU
- 1 GB RAM
- 20 GB HD (Add as much as you want)
- 2 Worker nodes
- 2 vCPU
- 4 GB RAM
- 20 GB HD
- 1 Master node
- 2 vCPU
- 4 GB RAM
- 20 GB HD
You'll want at least 20GB of storage per machine and perhaps more for the NFS server.
If you want to use the scripts contained in the Lab Materials you will need to do the following from each new server:
- Execute
git clone https://github.com/corymalon/KubeLabBuild.git - Execute
cd KubeLabBuild - Excecute
chmod +x *.sh
Networking Considerations
You'll want to assign static IPs or use DHCP reservations for your VMs. You can learn more about those here.
If your DHCP server doesn't automatically register DNS, you'll want to edit the hosts file on each server and add static entries for each node in the cluster. This can be done by using the command sudo nano /etc/hosts and following the template laid out in the file. Remember not to comment your entries with a # when adding them.
NFS Server Setup
Once you have your base install done for Ubuntu, you'll want to make sure that it's up to date. Use the following command or run update.sh.
sudo apt update && sudo apt upgrade -y
Once complete you'll need to execute the following commands or run nfsinstall.sh
sudo apt install nfs-kernel-server
sudo mkdir /mnt/contstore
sudo chown nobody:nogroup /mnt/contstore/
sudo chmod -R 777 /mnt/contstore/
This installs the NFS Server and sets up a share located at /mnt/contstore
Next you'll need to make the share avaialable. Do this by editing /etc/exports
sudo nano /etc/exports
At the end of the file add the following line
/mnt/contstore *(rw,sync,no_subtree_check,insecure,no_root_squash)
NOTE: This is not a configuration I would use in a production environment, but works for the purposes of this lab.
After saving and closing the file, execute sudo exportfs -a and the NFS server should be ready for us to use.
Kubernetes Base Setup
On both the Master node and two Worker nodes, you will either need to run base.sh or execute the following manually.
sudo apt update && sudo apt upgrade -y

sudo apt -y install curl apt-transport-https

curl -s https://packages.cloud.google.com/apt/doc/apt-key.gpg | sudo apt-key add -

echo "deb https://apt.kubernetes.io/ kubernetes-xenial main" | sudo tee /etc/apt/sources.list.d/kubernetes.list

sudo apt update

sudo apt -y install vim git curl wget kubelet kubeadm kubectl

sudo apt-mark hold kubelet kubeadm kubectl

sudo sed -i '/ swap / s/^\(.*\)$/#\1/g' /etc/fstab

sudo swapoff -a

sudo modprobe overlay

sudo modprobe br_netfilter

sudo tee /etc/sysctl.d/kubernetes.conf<<EOF
net.bridge.bridge-nf-call-ip6tables = 1
net.bridge.bridge-nf-call-iptables = 1
net.ipv4.ip_forward = 1
EOF

sudo sysctl --system

sudo apt update

sudo apt install -y curl gnupg2 software-properties-common apt-transport-https ca-certificates

curl -fsSL https://download.docker.com/linux/ubuntu/gpg | sudo apt-key add -

sudo add-apt-repository "deb [arch=amd64] https://download.docker.com/linux/ubuntu $(lsb_release -cs) stable"

sudo apt update

sudo apt install -y containerd.io docker-ce docker-ce-cli


sudo usermod -aG docker $USER

sudo mkdir -p /etc/systemd/system/docker.service.d

sudo tee /etc/docker/daemon.json <<EOF
{
  "exec-opts": ["native.cgroupdriver=systemd"],
  "log-driver": "json-file",
  "log-opts": {
    "max-size": "100m"
  },
  "storage-driver": "overlay2"
}
EOF

sudo systemctl daemon-reload

sudo systemctl restart docker

sudo systemctl enable docker
Master Node Configuration
From the master node, you will now need to execute master.sh or execute the following manually.
sudo systemctl enable kubelet

sudo kubeadm init

mkdir -p $HOME/.kube

sudo cp -i /etc/kubernetes/admin.conf $HOME/.kube/config

sudo chown $(id -u):$(id -g) $HOME/.kube/config

kubectl cluster-info

kubectl apply -f https://docs.projectcalico.org/manifests/calico.yaml

export KUBE_EDITOR=nano

kubectl get pods --all-namespaces
After this completes, you will see a message that looks similar to the following:
kubeadm join 192.168.252.100:6443 --token hhj7om.6mx432f7wktf0vzo \
        --discovery-token-ca-cert-hash sha256:489a493be0abc11cc58683ddc2af9b7578ac870bf03dff78f8db1f079e865170
You'll want to copy this and then execute it on your worker nodes using sudo.
sudo kubeadm join 192.168.252.100:6443 --token hhj7om.6mx432f7wktf0vzo \
        --discovery-token-ca-cert-hash sha256:489a493be0abc11cc58683ddc2af9b7578ac870bf03dff78f8db1f079e865170
Checking Node Status
After joining your nodes to the cluster execute the following from the master node and ensure that all nodes are in the ready state.
kubectl get nodes
Installing Helm
Helm charts can be used to deploy containers to your Kubernetes cluster. This will be required for using Kubeapps later in this guide. You can install be either executeing helm.sh or executing these commands manually.
curl -fsSL -o get_helm.sh https://raw.githubusercontent.com/helm/helm/main/scripts/get-helm-3
chmod 700 get_helm.sh
./get_helm.sh
Installing Terraform
Terraform is an increasingly popular way to deploy to your cluster. You can install by executing terraform.sh or executing these commands manually.
sudo apt-get update && sudo apt-get install -y gnupg software-properties-common curl

curl -fsSL https://apt.releases.hashicorp.com/gpg | sudo apt-key add -

sudo apt-add-repository "deb [arch=amd64] https://apt.releases.hashicorp.com $(lsb_release -cs) main"

sudo apt-get update && sudo apt-get install terraform

touch ~/.bashrc

terraform -install-autocomplete
Installing Metal Load Balancer
The metal load balancer is required to expose your containers from inside the Kubernetes cluster. They are running behind NAT.
Before continuing you'll need to either edit the values.yaml file from the Lab Materials, or create your own. This will be done with nano ~/values.yaml or nano ~/KubeLabBuild/values.yaml if using the file from the lab materials.
You will need to provide the IP address range avaialbe for your containers. I'd give it at least 10 IPs for the lab.
configInline:
  address-pools:
   - name: default
     protocol: layer2
     addresses:
     - YOUR-IP-ADDRESS-RANGE (eg. 192.168.1.20-192.168.1.50)
Execute metallb.sh or execute these commands manually:
helm repo add metallb https://metallb.github.io/metallb
helm repo update
helm install metallb metallb/metallb -f values.yaml
Configuring NFS Storage
We'll be using kubernetes-sigs/nfs-subdir-external-provisioner
to configure our NFS storage.
To install update storage.sh with your NFS server IP Address and then execute, or execute these commands manually:
helm repo add nfs-subdir-external-provisioner https://kubernetes-sigs.github.io/nfs-subdir-external-provisioner/
helm install wcra-storage nfs-subdir-external-provisioner/nfs-subdir-external-provisioner --set nfs.server=YOUR-NFS-SERVER-IP --set nfs.path=/mnt/contstore
After running this, execute kubectl get storageclass and you should see your new storage named nfs-client.
Installing Kubeapps
Kubeapps is a Helm chart management tool that is really handy for pushing out containers and is good hands for getting familiar with YAML and increases your chances for a successful build. You can install by executing kubeapps.sh or manually executing the commands below.
helm repo add bitnami https://charts.bitnami.com/bitnami
kubectl create namespace kubeapps
helm install kubeapps --namespace kubeapps bitnami/kubeapps
kubectl create --namespace default serviceaccount kubeapps-operator
kubectl create clusterrolebinding kubeapps-operator --clusterrole=cluster-admin --serviceaccount=default:kubeapps-operator
kubectl get secret $(kubectl get serviceaccount kubeapps-operator -o jsonpath='{range .secrets[*]}{.name}{"\n"}{end}' | grep kubeapps-operator-token) -o jsonpath='{.data.token}' -o go-template='{{.data.token | base64decode}}' && echo
kubectl config set-context $(kubectl config current-context) --namespace=kubeapps
kubectl expose deployment kubeapps --type=LoadBalancer --name=kubeappslb
kubectl get services -A
The last command kubectl get services -A will display the IP Address to login to Kubeapps with. it will be http://ip-address:8080

Save the token string that was output somewhere for safe keeping as it is used to log into Kubeapps.
Helm Deployment With Kubeapps
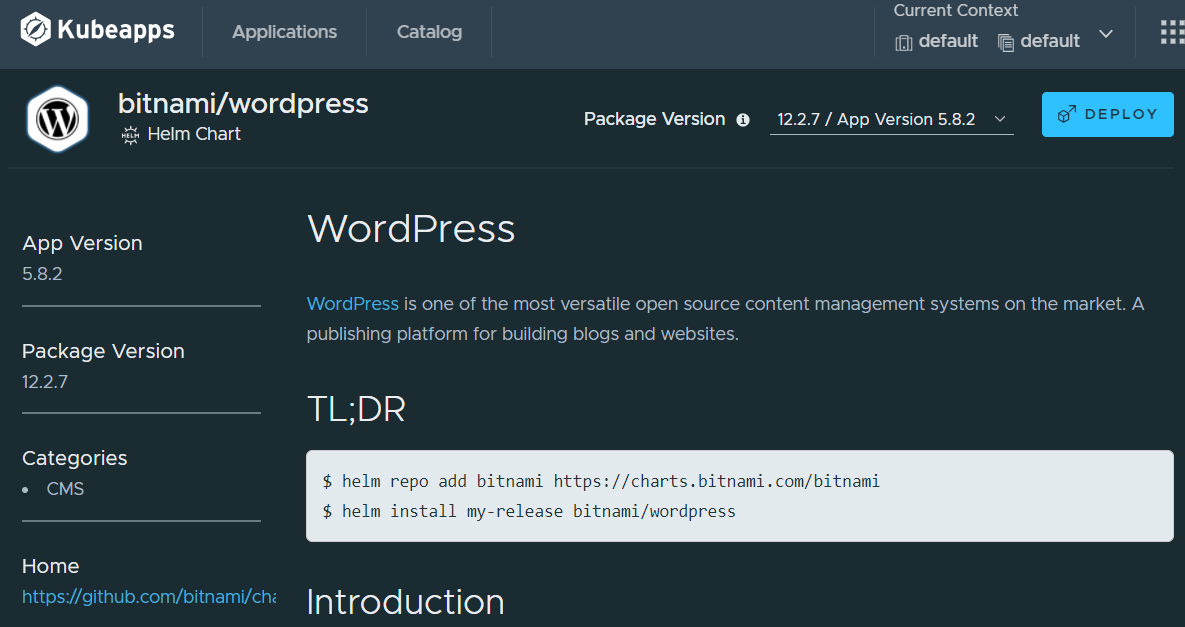
Now that you have Kubeapps installed, you can log in and go to the Catalog.

For this guide we're going to go ahead and deploy WordPress. Navigate to it in the Catalog (either from the main section or filtering on CMS) and then click on Deploy.
Fill out some of the basics in the provided form
- Name
- Username
- Admin email
- Blog Name
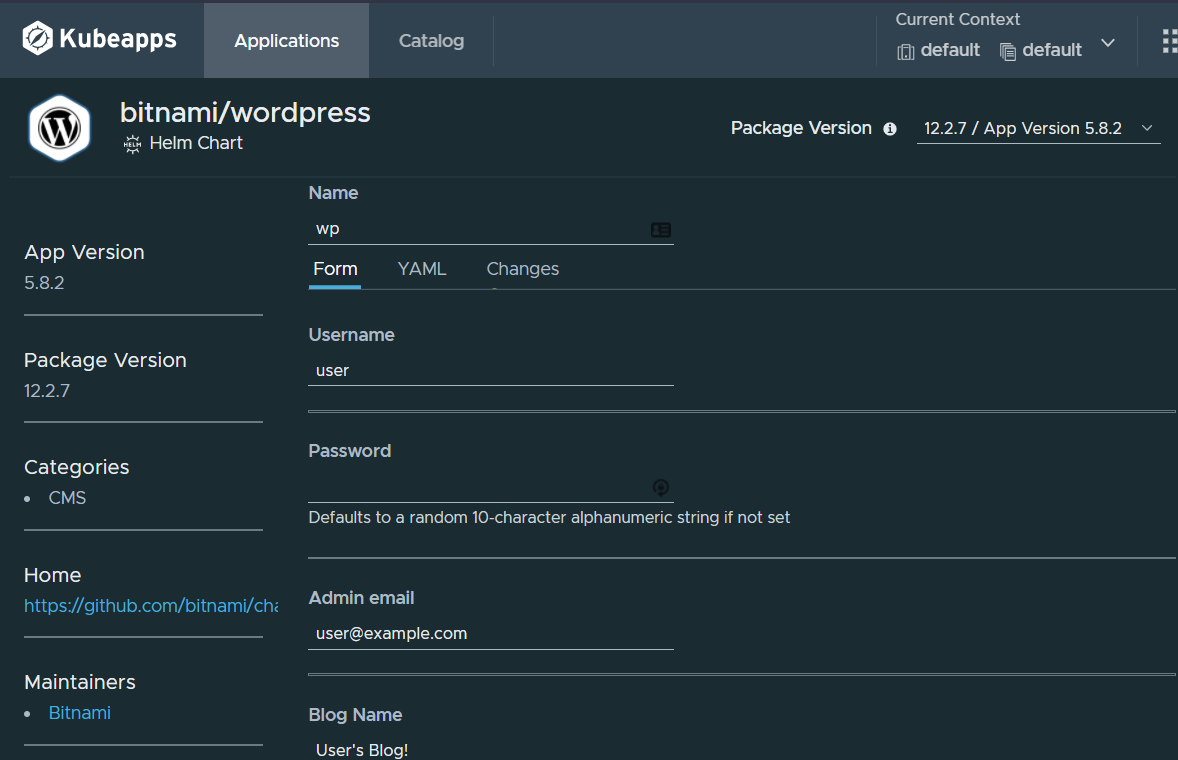
Notice I didn't say to specify a password. The deployment can autoconfigure a password for you. Before we actually deploy though, we'll need to navigate to the YAML tab.
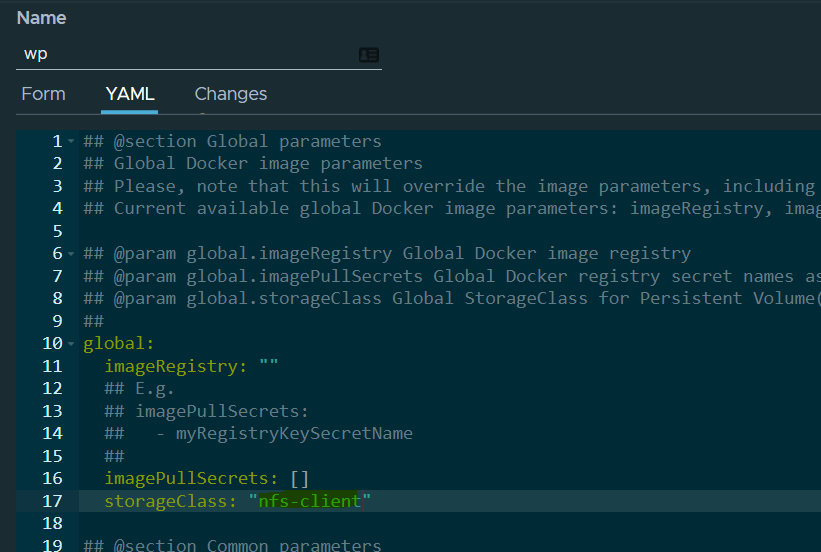
Once there we need to specify the storage class that we created as part of NFS Configuration steps from before. Specify nfs-client and then we can click deploy.
From your master node, switch back to the Default namespace:
kubectl config set-context $(kubectl config current-context) --namespace=default
Then run kubectl get pods. You should see your containers creating.

You can check that your Persistent Volume Claims were created successfully by executing kubectl get pvc and you should see them bound like this:


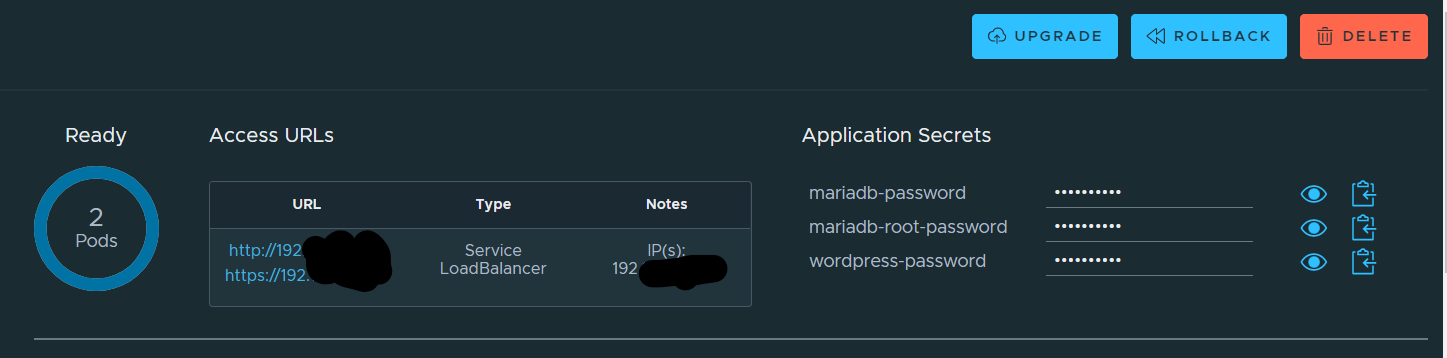
If you look back at your Kubeapps dashboard, you'll see information about your new deployment including IP addresses for you to access WordPress along with the passwords for MariaDB and WordPress.
NOTE: It is possible to target external databases as part of the deployment, but it is out of the scope for this guide.
Now navigate to the URL and you'll see that your site is alive.
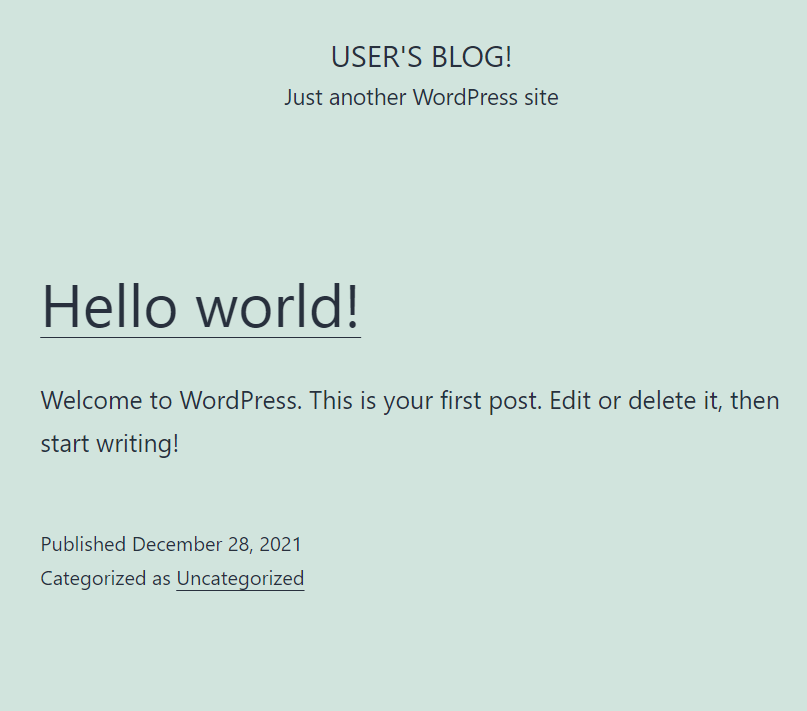
If you append /admin you can get to wp-admin and login with the username you provided and the password from the secrets if you didn't specify one yourself.
Now if you want to want to kill your deployment, just choose delete from the Kubeapps dashboard.

NOTE: For some reason this does not release the persistent volume claim for the database, only the application, and will have to be deleted manually. I have not investigated this any further. In my case when I ran kubectl get pvc I saw that my PVC was named data-wp-mariadb-0 so I will execute kubectl delete pvc data-wp-mariadb-0 to remove the persistent volume claim.
Kubectl Deployment
For this example we're going to use Network Chuck's examples. If we run nano ~/networkchuckcoffee_deployment.yaml we can paste in the YAML from here.
apiVersion: apps/v1
kind: Deployment
metadata:
  name: networkchuckcoffee-deployment
  labels:
    app: nccoffee
spec:
  replicas: 3
  selector:
    matchLabels:
      app: nccoffee
  template:
    metadata:
      labels:
        app: nccoffee
    spec:
      containers:
      - name: nccoffee
        image: thenetworkchuck/nccoffee:pourover
        imagePullPolicy: Always
        ports:
        - containerPort: 80